So, I decided that I am going to keep this blog up and running after this class ends. I want to continue attempting these techniques and hopefully develop my skill set so that I can create something that's not so embarrassing!
I plan to post photos of my progress and create some decent work!
Thursday, December 15, 2011
More about frescos...
A secco is the second of the three fresco painting techniques. It is different in that it uses completely dry plaster rather than the fresh plaster used in buon fresco. With buon fresco, there is no need for a binder because of the chemical reaction that occurs when the plaster is drying. Since the plaster is already dry in a secco, some type of binder such as egg, oil or glue is needed. Most a secco paintings have vanished as they did not stand the test of time, peeling and flaking away from the plaster surface. Buon fresco is a much more durable technique, but an a secco work, if done on a roughened surface, can be pretty durable itself.
It became more and more widely used over top of buon fresco to add detail and achieve the bright colors that wet plaster did not allow. There was also less guess work. When painting in buon fresco, the color variation was pretty extreme from the wet to dry. With a secco, there was little if any change in color. Another disadvantage to working in wet plaster is the time crunch to get each area done before it dies. “On the day of painting, a thinner, smooth layer of fine plaster, the intonaco, is added to the amount of wall that can be expected to be completed in a day, sometimes matching the contours of the figures or the landscape, but more often just starting from the top of the composition. This area is called the giornata("day's work"), and the different day stages can usually be seen in a large fresco, by a sort of seam that separates one from the next.”
It became more and more widely used over top of buon fresco to add detail and achieve the bright colors that wet plaster did not allow. There was also less guess work. When painting in buon fresco, the color variation was pretty extreme from the wet to dry. With a secco, there was little if any change in color. Another disadvantage to working in wet plaster is the time crunch to get each area done before it dies. “On the day of painting, a thinner, smooth layer of fine plaster, the intonaco, is added to the amount of wall that can be expected to be completed in a day, sometimes matching the contours of the figures or the landscape, but more often just starting from the top of the composition. This area is called the giornata("day's work"), and the different day stages can usually be seen in a large fresco, by a sort of seam that separates one from the next.”
Buon frescoes are difficult to create because of the deadline associated with the drying plaster. Generally, a layer of plaster will require ten to twelve hours to dry; ideally, an artist would begin to paint after one hour and continue until two hours before the drying time—giving seven to nine hours working time.
The third type of fresco painting is called mezzo-fresco. This is a technique where paint is applied to nearly dry plaster. There was a large advantage to this method; it allowed the artist to achieve the colors that a secco could, all the bright blues, etc. “ By the end of the sixteenth century this had largely displaced buon fresco, and was used by painters such as Gianbattista Tiepolo or Michelangelo. This technique had, in reduced form, the advantages of a secco work”
(http://en.wikipedia.org/wiki/Fresco)
When I created my masterpiece (just kidding!) I didn’t do much of anything to make it a true fresco. Since I’m a poor college student, I used my leftover plaster from when I took sculpture (I knew it would come in handy eventually) and acrylic paint. The proper way to create a buon fresco includes many many layers along with dry pigments.
Fresco Plaster Coats are made of high calcium lime putty and "aggregate" which, most commonly is washed river sand, marble meal, volcanic tuff or the combination of it. The proportion of the mortar or plaster mix generally is:
Fresco Plaster Coats are made of high calcium lime putty and "aggregate" which, most commonly is washed river sand, marble meal, volcanic tuff or the combination of it. The proportion of the mortar or plaster mix generally is:
1 part lime putty : 2 parts aggregate (sand)
Or
5 parts lime putty : 8 parts aggregate (sand)
Washed River Sand is the best aggregate for making a fresco plaster, it is clean from impurities such as silica, dust, clay, organic particles, and the biggest enemy of all plasters - SALTs. This sand is also most likely to be of a right angular shape needed for "proper interlocking".
Traditionally there are five distinctive fresco plaster coats (from last to first):
Traditionally there are five distinctive fresco plaster coats (from last to first):
1. Intonaco or Skim Coat - final plaster coat on wich the actual painting is done.
2. Arriccio or Brown Coat - smooth, sand finish coat on which intonaco is applied.
3. Float Coat - smooth plaster coat, base for arriccio coat. This coat is fine leveled and floated with darby and large wooden float. Usually this would be a "conventional" stucco finish installed by plastering contractor.
4. Rough Coat - rough plaster coat made with somewhat coarse sand. This coat is often combined with float coat by conventional plastering contractors.
5. Scratch Coat - the initial and one of the most important coats. This coat is applied directly to wire mash or wooden lath and then scratched with "tooth edged" trowel. Cement is often added to this coat for hard and fast setting.
"Cartoon" - full scale drawing of the future fresco. Cartoons are drawn on regular paper with pencil, graphite, charcoal, sepia chalk, etc., etc. The purpose of a cartoon is a thorough study and final rendition of the composition, light, shadow, details of the future fresco, it is a preparatory drawing taken to the next level. Correctly done cartoon is a "stand along" artwork. Although optional in other painting mediums, Cartoon is essential when paintng in Fresco not only as the main guideline for transferring the design onto freshly laid (fresco) plaster, but also as the main tool and method of understanding and orcestrating the steps for painting of the corresponding fresco.
(http://www.fresco-techniques.com/fresco-cartoon.html)
There’s just so many steps and a big part of fresco is that for a true fresco there are NO shortcuts. Of course, full-time school and a full-time job didn’t allow for too much extra time to go through every step. Now that I’m graduating, I will have a little more free time and I hope to create some real fresco paintings. Although my painting wasn’t up to true fresco standards, it was still a really fun and interesting experience and I’m feeling like I might enjoy the process and outcome of real fresco painting.
The quotes above were taken from a website that I found to be extremely informative. It is www.fresco-techniques.com and helped me understand the medium much better than before. After going through it, I feel more confident about creating a successful buon fresco.
And for your viewing pleasure, another fresco for you to look at!
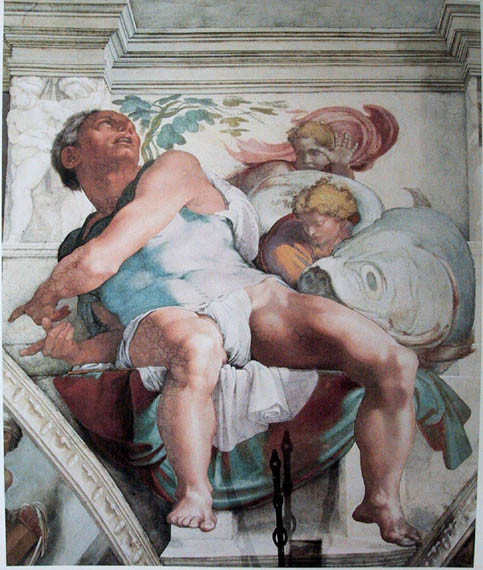
A fresco from the Sistine Chapel!
Tuesday, November 29, 2011
Encaustics with Enkaustikos!
I realized that I didn't post any of the videos I watched to help me along with my encaustic experiments...I found that the company Enkaustikos had the most helpful videos. There were some pretty terrible videos...terrible.
These are both Enkaustikos videos. The first is just an explanation of supplies and setting up your work area. The second video shows how to create surfaces with different heat sources and tools.
After my experiments, I had a chance to talk with Professor Noel, who uses encaustics in her own work. My discussion with her was extremely helpful as well as the material she sent me that included safety instructions along with step by step instructions for making your own encaustic paint. It turns out that it is much less expensive to create your own colors with wax and pigment. I definitely won't have time to play with this before the semester is out but I will be attempting it in the near future. I didn't think I would like this medium and now that I've used it, I'm very happy at my decision to splurge on the encaustic materials. Being a painter, I think it is very important to experiment with different methods and materials. Lately, I have been interested in combining 2-dimensional media to create my paintings and I am so excited to incorporate encaustics into my future pieces!
Totally worth it and SO amazing!
Totally worth it and SO amazing!
Monday, November 28, 2011
Buon Fresco
The word fresco is from the Greek word affresca, derived from the Latin word for "fresh". Frescoes were frist developed in ancient Greece but retained its popularity through the Renaissance. There are three types of fresco painting. The buon fresco technique is the first one I'll explain. This first technique involves painting on fresh, or wet, plaster. In ancient times, pigment would be mixed with water and then applied to the fresh plaster. There was no need for any type of binding agent due to the chemical reaction that happens as plaster dries. Once the plaster finished drying, the pigment would essentially be part of the plaster, creating a smooth surface. The only real downside buon fresco is that some pigments, mostly blues, did not work well with the wet plaster. Other than that, this technique is the most durable of the fresco painting techniques.
The earliest known buon fresco paintings are dated around 1500 BC in Greece on the island of Crete.
This is the most well-known of these ancient frescoes. Titled The Toreador (below), this fresco shows a sacred ceremony that involves jumping over large bulls.

The Roman wall paintings left in the ruins of Pompeii and Herculaneim were also painted in the buon fresco style.


This is inside of the Villa dei Misteri in Pompeii (above).
The Renaissance saw the most prominent use of fresco. In Italy, most churches and many government buildings still feature fresco decoration.
Clearly, the most well-known group of fresco paintings are at the Sistine Chapel, especially the ceiling, by Michaelangelo and the Last Supper, by Cosimo Rosselli located on the Northern wall.
 The Last Supper, Cosimo Rosselli
 the Creation of Adam
 the Creation of Eve
If you look at the Creation of Eve (Michaelangelo), you can see very clearly the incredible amount of dimensionality that Michaelangelo acheived. It is amazing how deceiving the painting can be even in the terrible reproductions you can find on a google image search.
So...I decided to try this out for myself. I watched close to 15 YouTube videos and read about 10 explanations of the buon fresco technique.
I was still pretty intimidated so I chose a very simple subject and just went for it. Technically, this isn't a true fresco, due to my lack of funds, I couldn't use pigments mixed with water. I had to use what I could scrounge up in my studio, some acrylic paint. This was just my first attempt. I actually kind of enjoyed it and I'm planning on trying it again, maybe with a subject I'm interested in and a piece I've planned out a little bit better.

This is my super fantastic first attempt at fresco painting. It's horrible, I admit but again, it was my first try. I really did like making it, despite the unfortunate outcome of my piece.
The earliest known buon fresco paintings are dated around 1500 BC in Greece on the island of Crete.
This is the most well-known of these ancient frescoes. Titled The Toreador (below), this fresco shows a sacred ceremony that involves jumping over large bulls.

The Roman wall paintings left in the ruins of Pompeii and Herculaneim were also painted in the buon fresco style.


This is inside of the Villa dei Misteri in Pompeii (above).
The Renaissance saw the most prominent use of fresco. In Italy, most churches and many government buildings still feature fresco decoration.
Clearly, the most well-known group of fresco paintings are at the Sistine Chapel, especially the ceiling, by Michaelangelo and the Last Supper, by Cosimo Rosselli located on the Northern wall.


If you look at the Creation of Eve (Michaelangelo), you can see very clearly the incredible amount of dimensionality that Michaelangelo acheived. It is amazing how deceiving the painting can be even in the terrible reproductions you can find on a google image search.
So...I decided to try this out for myself. I watched close to 15 YouTube videos and read about 10 explanations of the buon fresco technique.
I was still pretty intimidated so I chose a very simple subject and just went for it. Technically, this isn't a true fresco, due to my lack of funds, I couldn't use pigments mixed with water. I had to use what I could scrounge up in my studio, some acrylic paint. This was just my first attempt. I actually kind of enjoyed it and I'm planning on trying it again, maybe with a subject I'm interested in and a piece I've planned out a little bit better.

This is my super fantastic first attempt at fresco painting. It's horrible, I admit but again, it was my first try. I really did like making it, despite the unfortunate outcome of my piece.
Thursday, November 17, 2011
Encaustics
The word encaustic comes from the Greek term enkaustikos meaning "to burn in". This method of painting was used first by the people of ancient Greece. During the Hellenistic period, encaustic painting spread to Egypt. The most well-known encaustic paintings are the Egyptian mummy portraits. They were meant to be placed over the face of the deceased when they were mummified. I went on the last New York City bus trip on November 5th. One of the museums I visited was the Met. It turns out they have a large collection of these mummy portraits; they even have one still attached to the mummified body.


It's a pretty terrible picture but it's the best I could do in an extremely dark room with no flash. It looks benign in the photograph but seeing it in person was somewhat disturbing. The crazy thing is, these portraits are all still in fantastic shape. They look like they were just painted, with little cracking if any and no discoloration. I find the extremely long lifespan of encaustic paintings fascinating, especially when comparing it with oil, acrylic or tempera paint.
This video starts out weird and has creepy music...so I suggest you just turn the sound off. I wanted to post this video because it shows soooo many examples of encaustic mummy portraits.
"As encaustic painting flourished in Greece and Egypt, it was also inevitable to spread to Rome. Pliny, the Roman historian, wrote in 1st century C.E. that encaustic wax paint was being used in the Roman portraits and mythology paintings done on panels... Archeologists have been able to discover some Roman encaustic paintings. For instance, a painting on slate depicting Cleopatra being bitten by the asp was found near the ruins of Hadrian’s villa. After the Roman Empire fell, artists began turning to cheaper, quicker paint instead of the encaustic paint because the ancient heating process was so laborious for the wax." (Enkaustikos.com)
After that, the medium began to die off. It wasn't until the 18th century when the encaustic wax painted walls of Pompeii and Herculaneum were discovered that research on the method began. Still, there wasn't much in the way of technology and the process was still as long and boring as it was in ancient times.
BUT! Finally!!!!! Jasper Johns in the 50's and 60's was one of the first to display encaustic works to the public. He was a main factor in bringing the almost lost medium to the "forefront of the art community"

This is Jasper Johns' painting, Flag, made in 1954.
It's so interesting, to me at least, to see the progression and development of technologies and methods throughout history.
Today, it seems as though encaustic painting may be one of the easiest mediums to use much unlike ancient times. I decided to create my own little encaustic painting. I ordered the supplies and dove right in! Of course, I was completely in the dark, never using this method EVER in my life so I turned to videos on Blick's website and YouTube in hopes of helping me understand technique a little bit better.
<iframe src="http://www.youtube.com/embed/D93WI7Tdb9Q?fs=1" allowfullscreen="" frameborder="0" height="344" width="459"></iframe>
So...I set up my work space...

And played around for a little bit...

And this is eventually what I came up with...

I know, I know, it's pretty terrible but hey, it was my first try!
It was more experimentation than anything else. There are SO many surfaces you can create, there's so many other mediums you can combine with it and it's instant gratification because it dries IMMEDIATELY! Even though I wouldn't consider my piece a success, I loved every second of this little project!
Information found on the Enkaustikos website:
http://www.encausticpaints.com/Resources/HistoryofEncaustic/tabid/407/Default.aspx
http://www.encausticpaints.com/Resources/HistoryofEncaustic/tabid/407/Default.aspx
Sunday, October 9, 2011
The beginning, the Etruscans...
I wanted to start at the very beginning, with the Etruscans. Although wall paintings were supposedly only for the wealthiest of families, well-preserved wall paintings in the large underground tombs at Tarquinia have been discovered. These wall paintings show the specific themes of the time period in which the Etruscans lived. The materials used to create these wall paintings were the same popular materials used in later Roman paintings as well, plaster. Known as fresco painting, paint is applied to wet plaster in sections so that the painting becomes a part of the plaster and therefore the wall. I’ll post another blog about frescoes next and explain it in some depth.
Example # 1
Example # 1

the Tomb of the Lioness at Tarquinia
At this stage, proportions were not the primary focus of the artwork. If you look at this first example, it is clear that proportions were not paid close attention to. The very thin waist and extremely thick legs of the two characters illustrate this point. Not much attention is paid to the dimensionality of objects either with no variation of value, though the concept probably was not yet understood. You can also see that there is more attention paid to the detail in the landscape than to the figures, which is true of mostly all Etruscan paintings.
Example #2
Tomb of the Bulls at Tarquinia. This is from 540 BCE illustrating Achilles ambushing a Trojan prince.
See how this painting shows the moment just before the attack to convey a feeling of suspense. Also in this painting, the attention is mostly paid to the landscape elements.
Example # 3, 4

Looking at these two paintings, part of the Tomb of Hunting and Fishing in Tarquinia, the concern of the Etruscans with rendering nature and activities performed in nature is clear. Proportion and scale are not of importance as you can see by comparing the sizes of the figures to the sizes of the birds. But you do get a view into what the Etruscans enjoyed doing throughout the day as you can see especially by example #3, the figure is jumping from a cliff into the water, possibly for a swim. The color is still pretty flat, no real dimensionality or shadows to speak of.
Subscribe to:
Posts (Atom)